Under the Kitchen Sink: 7 Easy Ways to Organize Around Pipes
Open the cabinet under the kitchen sink and you probably know the scene: a maze of pipes, a leaning tower of spray bottles, and a pack of sponges you bought two years ago. It is one of the hardest spots in any home to keep tidy. The drain pipe cuts through the middle, the water lines hug the back wall, and a garbage disposal, if you have one, takes a big bite out of the space. Add a little moisture and a few heavy bottles, and clutter wins fast. Fortunately, you do not need a renovation. A few cheap tools and a smart layout can turn this awkward cabinet into a space that works. Here are seven ways to do it, starting with the prep that makes everything else easier.
Empty, Clean, and Prevent Under Sink Leaks
Before you buy a single organizer, pull everything out and put it on a towel. Wipe down the cabinet floor and walls, then take a close look at what is hiding back there. You want to prevent under sink leaks from turning into mold or warped wood, so look for these warning signs: If you want to dig deeper, our guide on Under-Bed Storage Ideas: 9 Easy Ways to Save Space covers this in more detail.
- Water stains, swollen wood, or peeling cabinet material
- Rust or green crust on pipe joints and fittings
- A musty smell that does not go away
- Drips on a dry paper towel after you run the tap and drain
A loose fitting sometimes needs only a gentle tightening. Anything bigger is a job for a plumber. The U.S. Environmental Protection Agency’s WaterSense leak guidance offers simple tips for finding and fixing household leaks. Once the cabinet is dry and clean, toss expired products, empty bottles, and duplicates, then sort what is left into groups.
7 Easy Ways to Organize Under the Kitchen Sink
The best under sink organizer ideas follow one rule: work with the pipes, not against them. Grab a tape measure and write down the cabinet’s width, height, and depth. Then note where the pipes run and how far they stick out. Pay special attention to the curved drain section, known as a trap, because it often sits right where you want to put a shelf. A quick sketch or a phone photo will help you shop with confidence. Measure twice, buy once, and keep the receipts, since many organizers fit some cabinets better than others. With your numbers ready, you can try the seven fixes below. You do not need all of them, so pick the ones that suit your cabinet.
1. Lay Down a Waterproof Tray or Liner
Start at the bottom. The floor of the cabinet takes the hits from spills, dripping bottles, and the occasional slow leak. A shallow tray with raised edges, or a liner you can trim to fit, protects the wood and gives you a clear view of the surface. Cut it carefully around the pipes so it lies flat, and leave the pipe connections uncovered so you can still see and reach them. A light-colored tray makes new drips easy to spot, and it comes out for quick rinsing in the tub. This one small step can save your cabinet from water damage and makes it easier to keep under the kitchen sink clean for years. This connects closely with another common issue — see Pots and Pans Storage: 9 Easy Ideas for Small Cabinets for more on that.
2. Use a U-Shaped Shelf Organizer
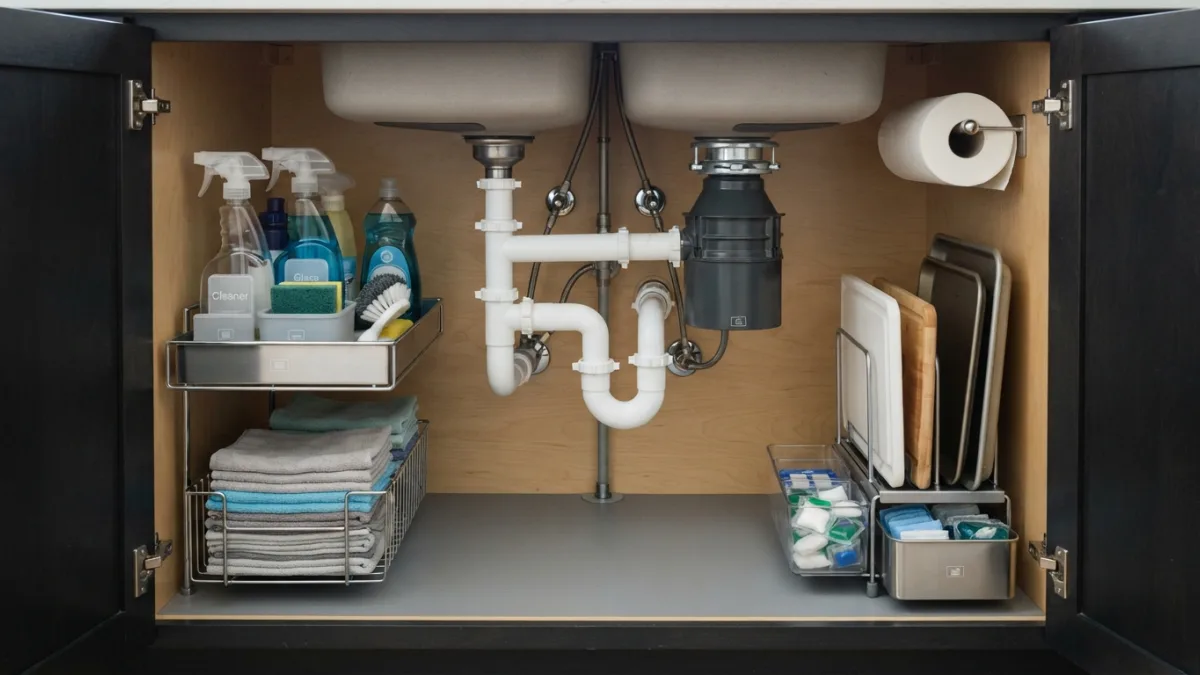
A u shaped shelf organizer is the most direct answer to the drain pipe problem. The open center slides around the pipe, so you get shelf space on both sides and a second level above the cabinet floor. That doubles the room for bottles, boxes, and sponge packs. Look for adjustable height so the shelf clears your trap, and check the weight limit on the label before you load it. Metal frames usually hold more, while plastic ones resist rust. Keep the heaviest items on the lowest level and place the things you grab daily at the front. If your cabinet has two drain pipes, such as with a double sink, measure the gap between them first.
3. Hang Things on a Tension Rod
A tension rod under sink cabinets gives you a hanging bar without drilling a single hole. Twist it to fit snugly between the side walls, high enough to clear the pipes and the disposal. Then hang spray bottles by their triggers, so the bottoms swing free and the shelf below stays open. It also works for rubber gloves on clips or a damp dishcloth that needs to dry. Pick a rod with rubber ends for grip, and test it with your heaviest bottle before you trust it. If the rod slips, move it lower where the walls are closer together, or choose a heavier-duty model. Always check the weight rating on the package.
4. Try Pull-Out Cabinet Drawers
Anything pushed to the back of a deep cabinet tends to disappear. Pull out cabinet drawers fix that by bringing the back to you. You slide the whole basket out, see every item at once, and slide it back in. Some models have a cut-out for the pipe, and others come as two narrow drawers, one on each side. Freestanding versions simply sit on the cabinet floor. Fixed versions screw into the cabinet, so check for hidden water or drain lines before you drill, and keep screws away from the pipes. If your cabinet has a center rail or a lip at the front, measure the door opening too, so the drawers can actually slide out. You might also find our article on Small Bathroom Storage Ideas: 7 Practical Tips (No Cabinets) helpful here.
5. Build a Cleaning Supplies Storage Zone
Good cleaning supplies storage starts with grouping. Put everyday tools, like a spray cleaner, a scrub brush, gloves, and sponges, in one caddy with a handle. Then you can carry it to the counter or the bathroom and bring it back in one move. Use a separate bin for refills and less-used products, and label it so no one has to guess. Keep products in their original containers, because the labels carry safety and usage instructions. If children or pets live in your home, store chemicals out of reach or behind a cabinet lock, and read the guidance from Poison Control on keeping household products safe. Never mix different cleaners, and keep them well apart anyway.
6. Protect Your Garbage Disposal Cabinet Space
Garbage disposal cabinet space is tight, so measure it before you buy anything. The unit hangs from the sink and takes up the middle of the cabinet, and its motor needs room around it. Do not stuff boxes tightly against it. Instead, choose narrow, short bins that sit to one side, or a low shelf that leaves a clear path to the unit. Keep the area in front of it open so you or a plumber can reach it quickly. Light, small things work best here, such as dish soap refills, spare sponges, or a box of dishwasher tablets. Heavy bottles belong on the lower level.
7. Use the Door for Small Kitchen Storage Hacks
Some of the best small kitchen storage hacks use space you already have: the inside of the cabinet door. Add a slim over-the-door rack, a row of adhesive hooks, or a small rail to hold sponges, dish towels, and a roll of trash bags. A towel bar or a mounted bag dispenser keeps liners handy for trash day. Keep the load light, since the hinges carry the weight. Close the door slowly after you install anything, to make sure nothing hits the pipes or the shelves inside. Do this, and the cabinet under the kitchen sink will hold more without looking crowded. For a related walkthrough, check out Store Cleaning Supplies: 7 Easy Ideas for Small Apartments.
Keep It Tidy After the Big Cleanup
Organizing is one afternoon, but keeping the cabinet in order takes a small habit. Once a month, open the doors, look for drips or damp spots, and put stray bottles back where they belong. Wipe the tray, check the rod and shelves, and toss anything empty. When you buy a new product, decide where it lives before you shelve it. Bring a quick flashlight check into your routine, because slow leaks often start quietly. If you manage only a few of the seven fixes, start with the tray and a U-shaped shelf, since they solve the biggest problems first. A neat cabinet saves time, protects your pipes, and makes every cleaning job a little easier.
FAQ: Organizing Under the Kitchen Sink
What should you never store under the kitchen sink?
Avoid anything that swells, molds, or spoils in damp air, such as paper towels, food, or cardboard boxes you want to keep. Also keep harsh chemicals away from children and pets. If you are unsure about a product, check its label for storage advice.
How do I organize under the kitchen sink with a garbage disposal?
Measure the space around the unit first, then use narrow bins or a low shelf that does not touch the motor. Leave a clear path to the disposal so repairs stay easy, and store only light items nearby.
Do I need to drill to organize around pipes?
No. Freestanding shelves, tension rods, and sliding baskets all work without tools. If you do choose to screw something in, check for hidden pipes and keep fasteners well away from them.
How often should I check for leaks in this cabinet?
A quick look once a month is a good habit. Check again if you notice a musty smell, a slow drain, or damp spots. Fix small drips early, and call a plumber if tightening a fitting does not stop them.
Is it safe to keep cleaning products here if I have kids?
It can be, but only with extra care. Use a childproof lock on the cabinet or move products to a higher shelf. Keep items in their original containers, and save the number for your local poison control center.

Ghani Mejber — Founder & Lead Editor
Ghani Mejber is the founder of DIY Homes Hub. After years of living in compact rentals with strict lease rules and limited storage, I started sharing practical, damage-free home upgrades and basic repair guides built for real budgets. Every project I publish focuses on simple tools, accessible materials, and reversible solutions that protect your security deposit.