Kitchen Countertop Covers: 7 Best Options for Renters
Your kitchen counters don’t have to stay stained, scratched, or stuck in 1985 just because you don’t own the place. Kitchen countertop covers let renters change a worn surface without a contractor, a big bill, or a fight over the security deposit. The best ones go on in an afternoon and come off when your lease ends. Some are sticky films, some are loose boards, and some are simple mats that just sit there and do their job. This guide walks through seven removable options, shows how to put them on, and explains how to take them off without a mess. Pick the one that fits your budget and the way you cook.
Before You Buy Kitchen Countertop Covers, Check Your Lease
If you want to cover ugly laminate counters, start with your rental agreement, not the shopping cart. Many leases ban permanent changes, but a removable cover is often fine. Still, a quick email to your landlord can save you trouble later, and a written “yes” is worth keeping. The U.S. Department of Housing and Urban Development has a tenant rights overview that explains the basics of renting in the United States. Rules differ by country and city, so check your local ones too. If you want to dig deeper, our guide on Rental Kitchen Cabinets: 7 Easy Ways to Cover Without Paint covers this in more detail. This is a common part of dealing with kitchen countertop covers, and it is worth keeping in mind.
Next, look closely at the surface. Is it smooth, dry, and in one piece? Deep chips, peeling edges, and swollen spots make adhesive products fail. Loose-lay options work better on damaged counters, because they do not need a perfect base. Measure every run of counter, including corners and the sink cutout, before you spend a cent. Many people run into this exact issue with kitchen countertop covers at some point.
7 Kitchen Countertop Covers You Can Take Off Later
These seven options range from sticky vinyl to boards you simply set down. Each one has a clear strength and a clear weak spot. Read all seven before you decide, because the cheapest choice is not always the right one for a busy kitchen. Keeping kitchen countertop covers in mind here will save you time later on.
1. Peel and Stick Countertop Film
A peel and stick countertop film is a thin vinyl sheet with a sticky back, and it is the most popular choice for good reason. It comes in rolls, so you can cover a long counter with few seams. Patterns range from solid colors to stone and wood looks. The film is waterproof and wipes clean with a damp cloth, which suits most daily cooking. The catch is heat and knives. Hot pans can warp or melt vinyl, and sharp blades can slice it. Check the maker’s label for temperature limits. Vinyl is a form of PVC, a plastic you can read about on Wikipedia’s PVC page, so keep it away from open flames and hot burners. This detail matters more than it seems once kitchen countertop covers comes up again.
2. Faux Marble Contact Paper
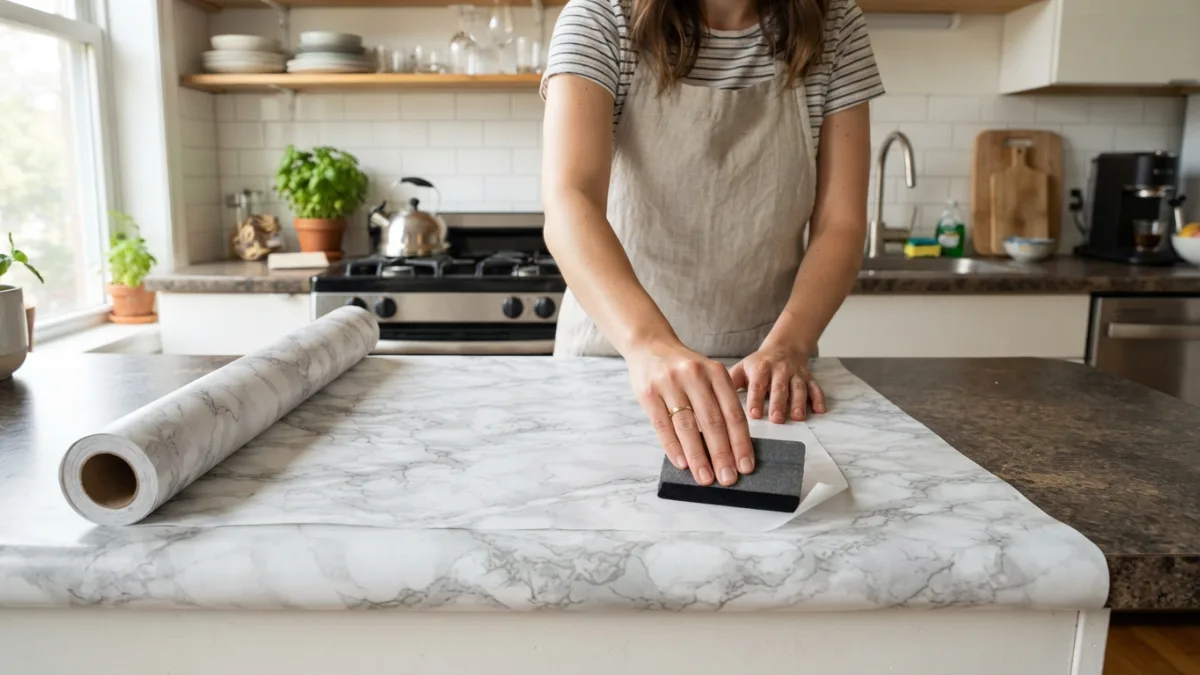
Faux marble contact paper gives you a high-end look for a small price, which is why it fills so many rental kitchen photos online. Choose a thick, matte, or lightly textured version if you can. Thin glossy sheets show every bump, bubble, and fingerprint. Look for veining that runs across the roll in a natural way, because repeating patterns make seams easy to spot. Take extra care with the first strip, since it sets the line for everything after it. Contact paper is not as tough as a true countertop, so use cutting boards and trivets. Think of it as a good-looking skin, not armor. This connects closely with another common issue — see Cover Ugly Rental Floors: 7 Easy Damage-Free Ideas for more on that. It is one of those small things that makes kitchen countertop covers easier to manage overall.
3. A Heat Resistant Counter Protector
A heat resistant counter protector solves a problem that most films cannot: hot cookware. Large silicone mats, tempered glass covers, and thick stone-style boards can sit beside the stove and take the heat. They do not stick, so they cause no damage to the surface underneath. Silicone mats are light and easy to store. Glass and stone-style boards feel more solid but weigh more and can chip if dropped. None of these covers a whole kitchen, so pair them with a film or a board elsewhere. Always check the temperature rating printed on the product, and do not assume a mat is safe at any heat. This is a common part of dealing with kitchen countertop covers, and it is worth keeping in mind.
4. Butcher Block Style Boards
Large wood boards or butcher block slabs can turn a bare counter into a warm work area. Set them on top of the existing surface, and add rubber feet or a non-slip layer so they stay put. Wood is gentle on knives and gives you a real cutting surface, which films never will. It does need care. Wipe spills quickly, avoid soaking it, and oil it now and then as the maker advises. Boards work best on short runs, like the space beside a stove or a prep corner. Covering a full kitchen this way gets expensive fast, and wood can be heavy to move. Many people run into this exact issue with kitchen countertop covers at some point.
5. Self-Adhesive Vinyl Tiles
Self-adhesive vinyl tiles, sold for floors, can also work on counters if the maker allows it. They come in squares, so you can mix patterns or make a simple checkerboard. Tiles are thicker than film, which hides small flaws in the surface below. Seams are the weak point, since water and crumbs find their way into gaps. Press the edges firmly and keep the tiles tight together. A thin line of removable sealant along the edges can help, but test it somewhere hidden first. Because tiles stick strongly, they can be harder to remove later, so warm them slowly when moving day arrives. Keeping kitchen countertop covers in mind here will save you time later on.
6. Non-Slip Liners and Waterproof Vinyl Rolls
The simplest cover is one that does not stick at all. Non-slip shelf liner and waterproof vinyl rolls can be cut to size and laid flat on the counter. They hold themselves in place with grip or weight. Prices stay low, and you can replace a stained piece in minutes. They suit rentals where you want zero risk to the surface or the landlord’s mood. The look is plainer than film, and edges can curl, so trim carefully and tape the underside lightly if needed. Wipe them down often, and lift them every few weeks to clean the counter beneath. You might also find our article on Removable Window Film: 7 Easy Steps to Apply and Peel Off helpful here. This detail matters more than it seems once kitchen countertop covers comes up again.
7. Loose-Lay Panels for a Temporary Countertop Makeover
For a true temporary countertop makeover, try thin panels cut to fit your counter exactly. Home improvement stores can often cut plywood, MDF, or acrylic sheets to size for a small fee. You can paint, wrap, or seal the top, then rest the panel on the old counter. Nothing is glued, so removal is as easy as lifting it off. This route suits damaged counters that adhesives cannot grip. Make sure the panel sits flat and does not rock. Seal any wood well, especially near the sink, because moisture will warp it. The work takes more effort, but the result looks custom. It is one of those small things that makes kitchen countertop covers easier to manage overall.
Quick Comparison of Removable Countertop Options
Here is a simple side-by-side view of kitchen countertop covers so you can narrow your list fast. Use it as a starting point, then read the product details before you buy. This is a common part of dealing with kitchen countertop covers, and it is worth keeping in mind.
| Option | Uses adhesive? | Best for | Main watch-out |
|---|---|---|---|
| Vinyl film | Yes | Full counters, smooth surfaces | Heat and knife cuts |
| Marble-look paper | Yes | Style on a small budget | Shows bubbles and seams |
| Heat protector mat or glass | No | Beside the stove | Covers only small areas |
| Wood boards | No | Prep zones | Needs care and oiling |
| Vinyl tiles | Yes | Uneven or worn counters | Gaps at seams |
| Non-slip liner | No | Zero-risk rentals | Plain look, curling edges |
| Loose-lay panels | No | Damaged counters | Needs cutting and sealing |
How to Install Countertop Film Step by Step
Knowing how to install countertop film properly makes the difference between a smooth finish and a bubbly one. Start by cleaning the counter with a degreasing cleaner, then let it dry fully. Any grease or dust under the film will show through later. Measure each section and cut the film a few inches larger than needed. Peel back a small strip of the backing, line up one edge, and press it down. Then smooth the film outward with a squeegee or a credit card, peeling the backing away as you go. Work slowly, and lift and re-lay the film if you spot a bubble. Many people run into this exact issue with kitchen countertop covers at some point.
- Clean and dry the counter completely.
- Measure twice and cut the film with extra room.
- Peel a few inches of backing and set the first edge straight.
- Smooth from the center outward to push out air.
- Trim the edges with a sharp craft knife and a straight edge.
Removing Adhesive Without Damage When You Move Out
Removing adhesive without damage is easier when you take your time. Warm the film gently with a hair dryer on a low setting, which softens the glue. Then lift one corner and peel back slowly at a low angle, rather than yanking straight up. If residue stays behind, try warm soapy water first, then a little rubbing alcohol or a gentle adhesive remover on a cloth. Test any product on a hidden spot before using it more widely. Ventilation matters when you use solvents, and the EPA’s indoor air quality resources explain why fresh air helps. Skip metal scrapers on laminate, since they scratch. For a related walkthrough, check out Hang Curtains Without Drilling: 7 Easy No-Damage Tips. Keeping kitchen countertop covers in mind here will save you time later on.
The Smart Way to Handle Cheap Rental Kitchen Updates
Cheap rental kitchen updates work best when you match the product to the real problem. If your counters are stained but sound, a film may be all you need. If they are cracked or burned, a loose panel or board makes more sense. Mix and match when it helps. A film across most of the surface, plus a heat-safe mat by the stove, gives you looks and protection for modest money. Take photos before you start and after you finish, so you can show your landlord the surface stayed safe. With a little planning, kitchen countertop covers can change how your home feels, and you can walk away with your deposit intact. This detail matters more than it seems once kitchen countertop covers comes up again.
Frequently Asked Questions
Are kitchen countertop covers safe for rental kitchens?
Yes, if you choose removable types and follow the product instructions. Loose-lay options carry the least risk. Adhesive films are usually fine on clean, sealed laminate, but test a hidden spot first and ask your landlord if you are unsure. It is one of those small things that makes kitchen countertop covers easier to manage overall.
Can I put a hot pan on a countertop cover?
Not on most films, papers, or liners. Heat can warp or melt them. Use a trivet or a heat-rated mat, and read the maker’s temperature limits before you cook. This is a common part of dealing with kitchen countertop covers, and it is worth keeping in mind.
How long do removable countertop covers last?
It depends on the product and how you use the kitchen. Films can last a good while with careful use, but cuts, heat, and water at the seams shorten their life. Boards and mats often last longer. Many people run into this exact issue with kitchen countertop covers at some point.
Will a countertop cover damage my landlord’s counters?
It should not if you prepare the surface, use a quality product, and remove it slowly with gentle heat. Rushing the removal or using sharp metal tools is what usually causes harm. Keeping kitchen countertop covers in mind here will save you time later on.
What is the cheapest option for hiding an old counter?
Non-slip liners and basic vinyl film are usually the lowest-cost choices. Prices vary by store and size, so measure your counters and compare before buying.

Ghani Mejber — Founder & Lead Editor
Ghani Mejber is the founder of DIY Homes Hub. After years of living in compact rentals with strict lease rules and limited storage, I started sharing practical, damage-free home upgrades and basic repair guides built for real budgets. Every project I publish focuses on simple tools, accessible materials, and reversible solutions that protect your security deposit.