Fold Down Wall Desk: 7 Easy Steps for Small Spaces
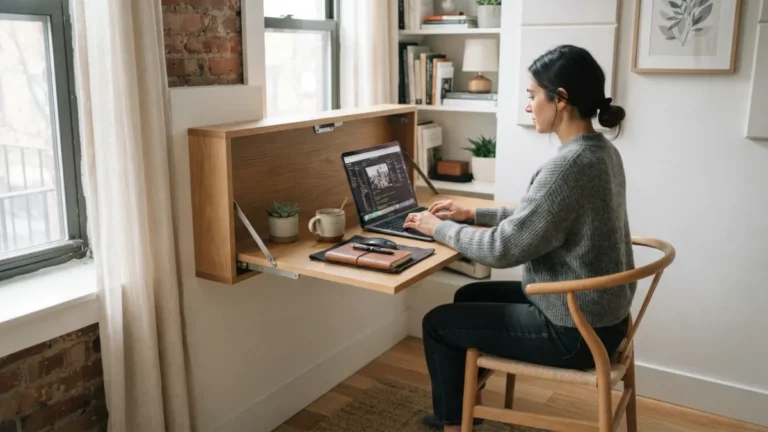
Picture this: it’s 9 a.m., your laptop sits on a pile of cushions, and your back is already complaining. Now picture a clean wall that opens into a proper desk in ten seconds. A fold down wall desk gives you that, and it takes almost no room once you close it. You don’t need a workshop or years of experience to build one. A weekend, a few basic tools, and one sheet of plywood are enough. This guide walks you through seven clear steps, from planning to the final coat, so you can add a real workspace to a studio, a bedroom corner, or a narrow hallway without giving up floor space.
Before you start, think about where the desk will live and what it needs to carry. A laptop and a notebook are light. A big monitor, a printer, and a stack of books are not. Your answer decides how strong the hardware must be and how carefully you must attach everything to the wall. Most people can finish this project in a weekend, and a lot of that time goes to waiting for the finish to dry. Read all seven steps once before you cut anything. That small habit saves money, time, and a few frustrated sighs. If you want to dig deeper, our guide on Small Space Desk Ideas: 7 Best Fold-Away Picks for 2026 covers this in more detail. This is a common part of dealing with fold down wall desk, and it is worth keeping in mind.
Why a Fold-Down Desk Works as a Space Saving Home Office
A space saving home office only works if it disappears when you stop working. That is the big advantage of a desk that folds flat against the wall. When it is closed, you get your floor back, and the room can be a bedroom, a living room, or a hallway again. When it is open, you get a stable surface at a comfortable height. Comfort matters, because small setups often lead to bad posture. OSHA offers a helpful computer workstations guide with simple advice on chair height, screen position, and arm placement. Keep those basics in mind as you plan, and your tiny desk will feel a lot bigger. Many people run into this exact issue with fold down wall desk at some point.
How to Build a Fold Down Wall Desk in 7 Steps
Here is the short version of what you will need. Exact sizes depend on your plans and your wall, so treat this as a starting checklist and adjust it as you go. Keeping fold down wall desk in mind here will save you time later on.
- One sheet of sanded plywood, about 3/4 inch (18 mm) thick
- A continuous hinge or two to three heavy-duty hinges
- Folding brackets, a swing-out leg, or another support
- Structural wood screws that reach deep into the wall studs
- A stud finder, level, tape measure, drill, and saw
- Sandpaper, a finish, and a power strip with cable clips
Step 1: Choose Wall Mounted Desk Plans and Measure Your Space
Start with paper, not wood. Good wall mounted desk plans show the size of each part, the hardware position, and the total weight the desk should carry. Free plans online vary in quality, so compare a few and pick the one that matches your room. Then measure your own space. A depth of 16 to 24 inches (40 to 60 cm) suits most laptop users, and a width of 30 to 48 inches (75 to 120 cm) gives you room for a notebook and a mouse. Aim for a desktop height of about 28 to 30 inches (71 to 76 cm), then adjust it to your chair and elbows. Check that the open desk will not block a door, a radiator, or an outlet. This detail matters more than it seems once fold down wall desk comes up again.
Step 2: Cut a Plywood Desk Top and the Mounting Board
A plywood desk top is a smart choice here. Plywood is made of thin layers glued together, which makes it strong and less likely to warp than a single wide plank. Use sanded plywood about 3/4 inch (18 mm) thick, with a smooth face on top. Mark your size, then cut it with a circular saw and a straight guide, or ask the store to make the cuts for you. Next, cut a mounting board from plywood or solid lumber. This board, often called a ledger, will hold the hinge and carry most of the load. Round the corners of the desktop slightly so nobody bumps into a sharp edge. This connects closely with another common issue — see TV Wall Placement Ideas: 7 Best Tips for Perfect Height for more on that. It is one of those small things that makes fold down wall desk easier to manage overall.
Step 3: Find Wall Studs and Mark Your Layout
Your desk is only as safe as the wall behind it, so find wall studs before you drill a single hole. A stud finder does this quickly, and a light knock on the wall can help you confirm the result. In many homes studs sit 16 inches (about 40 cm) apart, though some walls use 24 inches. Mark the center of each stud, then use a level to draw a straight line where the mounting board will go. Look out for wires and pipes near outlets and switches. Screw the board into at least two studs. On brick or concrete, use proper masonry anchors, and ask a professional if you feel unsure. This is a common part of dealing with fold down wall desk, and it is worth keeping in mind.
Step 4: Attach the Folding Desk Hinge Hardware
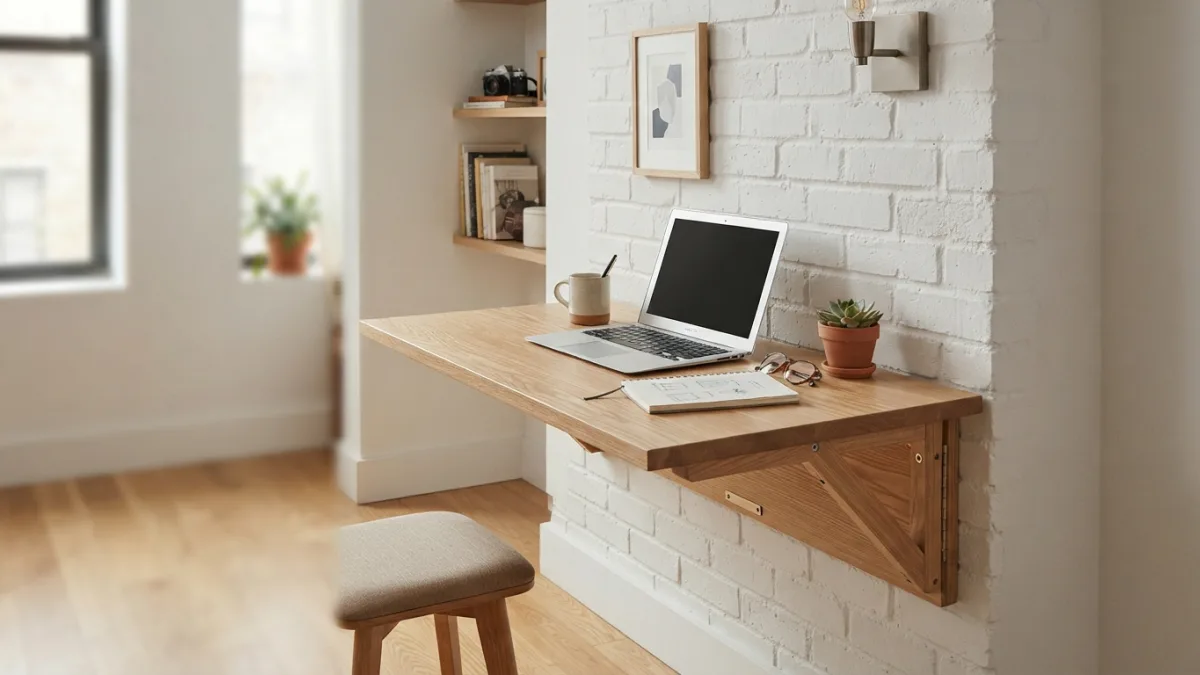
Now the desk gets its moving part. Good folding desk hinge hardware is the heart of this build, so don’t cheap out. A continuous hinge, often called a piano hinge, spreads the load along the whole back edge and feels very steady. Heavy-duty butt hinges also work if you use three of them and space them evenly. Check the weight rating on the package, and choose screws that won’t poke through the plywood. Drill small pilot holes first so the wood doesn’t split. Ask a helper to hold the desktop level while you fasten the hinge to the mounting board, and test the swing before you tighten every screw. Many people run into this exact issue with fold down wall desk at some point.
Step 5: Add a Fold Away Desk Support
An open desktop needs help, and a solid fold away desk support keeps it from sagging or dropping. You have a few good options: Keeping fold down wall desk in mind here will save you time later on.
- Folding brackets: They lock in place and fold flat against the wall. Many people find them the cleanest choice.
- Swing-out leg: A hinged leg adds strong support and works well for heavier setups, though it takes a little floor space.
- Chains or cables: They are simple and cheap, but they offer less rigid support under pressure.
Screw brackets into studs, not just the drywall. Then test your fold down wall desk with light weight first, and add more slowly. If anything flexes, stop and fix it. You might also find our article on Small Apartment Layout Ideas: 7 Easy Fixes for Tight Spaces helpful here. This detail matters more than it seems once fold down wall desk comes up again.
Step 6: Sort Out Desk Cable Management
Loose cords can ruin a clean little desk, so plan desk cable management before you finish the build. Mount a power strip on the wall beside the desk, and run just one plug to the outlet. Leave a little slack near the hinge so cables don’t stretch or get pinched when you fold the desk. Flexible cable sleeves and adhesive clips keep cords tidy along the edge. A wireless mouse and keyboard remove even more clutter. Keep every cable on the wall side of the pivot, and check the closing motion slowly the first few times. A cord caught in a hinge can damage both the wire and the wood. It is one of those small things that makes fold down wall desk easier to manage overall.
Step 7: Sand and Choose a Wood Finish for Desk Surfaces
The last step protects your work. Sand the desktop with medium paper first, then move to a finer grit for a smooth feel, and wipe away all dust. Pick a wood finish for desk use that can handle coffee rings and daily wear. Water-based polyurethane is a popular choice because it dries clear and cleans up with water. Hardwax oil gives a softer, natural look, and paint works well if you want color. Apply thin coats, and follow the dry times on the label. Finish the edges and the underside too, since this helps the wood resist moisture changes. Work in a ventilated room, then reattach the desk once everything is fully dry. This is a common part of dealing with fold down wall desk, and it is worth keeping in mind.
Final Thoughts on Your Fold Down Wall Desk
A small home doesn’t have to mean a cramped workday. With careful measuring, solid mounting into studs, strong hinges, and a sturdy support, a fold down wall desk can handle everyday work and still vanish when you’re done. Take your time with the first three steps, because they decide how safe and steady the finished desk will feel. Add a tidy cable plan and a durable finish, and you will enjoy it for years. Then pour a coffee, open the desk, and enjoy the first workday at a space you built yourself. Many people run into this exact issue with fold down wall desk at some point.
FAQ: Building a Fold Down Wall Desk
How much weight can a fold-down wall desk hold?
It depends on your hinge, brackets, screws, and wall. Check the rating on each piece of hardware, and attach everything to studs. Test the desk with light weight first, then add more slowly. For a related walkthrough, check out Small Living Room Layout: 7 Easy Ideas for TV & Dining Table. Keeping fold down wall desk in mind here will save you time later on.
What is the best wood for a fold-down desk?
Sanded plywood about 3/4 inch (18 mm) thick is a strong, practical choice. It resists warping better than many single boards. Hardwood plywood gives you a smoother surface and a nicer look. This detail matters more than it seems once fold down wall desk comes up again.
Can I install a fold-down desk in a rental?
Maybe. Many landlords allow wall mounting, but screw holes will stay in the wall. Check your lease and ask permission first. Holes in studs can usually be patched when you move out. It is one of those small things that makes fold down wall desk easier to manage overall.
How deep should a small wall desk be?
For a laptop, 16 to 24 inches (40 to 60 cm) usually works well. If you want a larger monitor, go deeper so you can sit at a comfortable distance from the screen.
Do I really need to find the studs?
Yes, in most cases. Drywall alone cannot hold the weight of a desk and a person leaning on it. Use a stud finder, and screw the mounting board into at least two studs.

Ghani Mejber — Founder & Lead Editor
Ghani Mejber is the founder of DIY Homes Hub. After years of living in compact rentals with strict lease rules and limited storage, I started sharing practical, damage-free home upgrades and basic repair guides built for real budgets. Every project I publish focuses on simple tools, accessible materials, and reversible solutions that protect your security deposit.